> ## Documentation Index
> Fetch the complete documentation index at: https://docs.magichour.ai/llms.txt
> Use this file to discover all available pages before exploring further.
# Webhook Quickstart
> Set up webhooks and test them end-to-end in under 10 minutes
By the end of this guide, you'll have:
* Created a webhook endpoint in your application
* Registered it with Magic Hour
* Tested it with a real API call
* Verified webhook delivery works
## How Webhooks Work
Webhooks let you receive real-time notifications when your API requests complete, instead of polling for status updates.
```mermaid theme={null}
sequenceDiagram
participant app as Your Application
participant mh as Magic Hour
app->>mh: 1. Create video/image job
mh-->>app: 2. Job ID returned immediately
mh->>mh: 3. Process job in background
mh->>app: 4. Send webhook when complete
app->>mh: 5. Return 2xx Response
```
## Step 1: Create Your Webhook Endpoint
First, let's create a simple webhook handler that can receive and process events.
**Using Jupyter/Colab?** The server examples below are for standalone deployment. For notebook
testing:
1. Use [webhook.site](https://webhook.site) for instant webhook testing (no code needed). See the "webhook.site" tab in Step 2
2. Or use the notebook-friendly code in the "Colab/Jupyter"
tab below
```python Python (FastAPI) theme={null}
from fastapi import FastAPI, Request
import json
app = FastAPI()
@app.post("/webhook")
async def webhook_handler(request: Request):
# Get the event data
event = await request.json()
# Log the event for testing
print(f"Received event: {event['type']}")
print(f"Payload: {json.dumps(event['payload'], indent=2)}")
# Handle different event types
match event['type']:
case 'video.started':
print('🎬 Video processing started')
case 'video.completed':
print('✅ Video processing completed')
# Download URL available in event['payload']['downloads']
case 'video.errored':
print('❌ Video processing failed')
case 'image.completed':
print('🖼️ Image processing completed')
case 'image.errored':
print('❌ Image processing failed')
# Always return success
return {"success": True}
if __name__ == "__main__":
import uvicorn
uvicorn.run(app, host="0.0.0.0", port=8000)
```
```typescript Node.js (Express) theme={null}
const express = require("express");
const app = express();
app.use(express.json());
app.post("/webhook", (req, res) => {
const { type, payload } = req.body;
// Log the event for testing
console.log(`Received event: ${type}`);
console.log(`Payload:`, JSON.stringify(payload, null, 2));
// Handle different event types
switch (type) {
case "video.started":
console.log("🎬 Video processing started");
break;
case "video.completed":
console.log("✅ Video processing completed");
// Download URL available in payload.downloads
break;
case "video.errored":
console.log("❌ Video processing failed");
break;
case "image.completed":
console.log("🖼️ Image processing completed");
break;
case "image.errored":
console.log("❌ Image processing failed");
break;
}
// Always return success
res.status(200).json({ success: true });
});
const port = 8000;
app.listen(port, () => {
console.log(`🚀 Webhook server running on http://localhost:${port}`);
});
```
```python Colab/Jupyter theme={null}
# Notebook-friendly webhook server
from fastapi import FastAPI, Request
import json
import nest_asyncio
import threading
import uvicorn
import time
# Install required packages first:
# !pip install fastapi uvicorn nest-asyncio pyngrok
# Allow nested event loops (required for notebooks)
nest_asyncio.apply()
app = FastAPI()
@app.post("/webhook")
async def webhook_handler(request: Request):
# Get the event data
event = await request.json()
# Log the event for testing
print(f"Received event: {event['type']}")
print(f"Payload: {json.dumps(event['payload'], indent=2)}")
# Handle different event types
match event['type']:
case 'video.started':
print('🎬 Video processing started')
case 'video.completed':
print('✅ Video processing completed')
case 'video.errored':
print('❌ Video processing failed')
case 'image.completed':
print('🖼️ Image processing completed')
case 'image.errored':
print('❌ Image processing failed')
return {"success": True}
# Notebook-friendly server startup
def run_server():
uvicorn.run(app, host="0.0.0.0", port=8000, log_level="info")
# Start server in background thread
server_thread = threading.Thread(target=run_server, daemon=True)
server_thread.start()
# Wait for server to start
time.sleep(2)
print("🚀 Webhook server running on http://localhost:8000")
# For Colab: Use ngrok to make it public
try:
from pyngrok import ngrok
public_url = ngrok.connect(8000)
print(f"📡 Public URL: {public_url}")
print(f"Use this URL in Magic Hour: {public_url}/webhook")
except ImportError:
print("💡 Install pyngrok for public URL: !pip install pyngrok")
print("Or use webhook.site for easier testing")
```
## Step 2: Make Your Endpoint Publicly Accessible
Your webhook endpoint needs to be accessible from the internet. For testing, use one of these options:
**Install ngrok:**
```bash theme={null}
# macOS
brew install ngrok
# Windows/Linux - download from https://ngrok.com/download
```
**Start your server:**
```bash Python theme={null}
python webhook_server.py
# or
uvicorn main:app --host 0.0.0.0 --port 8000
```
```bash Node.js theme={null}
node webhook_server.js
```
**Expose it publicly:**
```bash theme={null}
ngrok http 8000
```
**Copy the HTTPS URL** (e.g., `https://abc123.ngrok.io`)
**Perfect for Colab/Jupyter users!** No server setup required.
1. Go to [webhook.site](https://webhook.site)
2. Copy the unique URL provided (e.g., `https://webhook.site/abc-123-def`)
3. Use this URL directly in Magic Hour webhook setup
4. View received webhooks in real-time in your browser
5. Perfect for testing and debugging webhook payloads
**Pros**: Instant setup, no code needed, great for testing\
**Cons**: Public URL, not suitable for production
**For notebook environments with the code above:**
1. **Install dependencies:**
```python theme={null}
!pip install fastapi uvicorn nest-asyncio pyngrok
```
2. **Run the notebook-friendly code** from Step 1
3. **Get your public URL:**
* The code will automatically create an ngrok tunnel
* Copy the public URL shown (e.g., `https://abc123.ngrok.io/webhook`)
4. **Use the URL** in Magic Hour webhook setup
**Note**: Free ngrok URLs change each time you restart. For persistent URLs, sign up for a free ngrok account.
## Step 3: Register Your Webhook
Go to Magic Hour [Developer Hub](https://magichour.ai/developer?tab=webhooks), and click **Create Webhook**
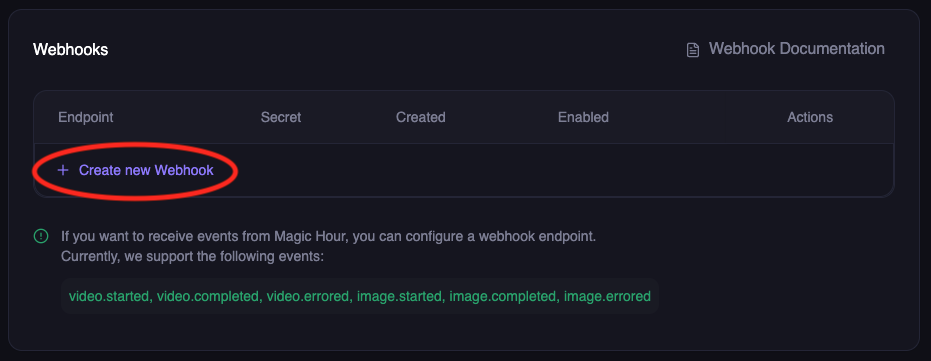 Enter your webhook details:
* **Endpoint URL**: Your public HTTPS URL (e.g., `https://abc123.ngrok.io/webhook`)
* **Events**: Select the events you want to receive:
* `video.started` - When video processing begins
* `video.completed` - When video is ready for download
* `video.errored` - When video processing fails
* `image.started` - When image processing begins
* `image.completed` - When image is ready for download
* `image.errored` - When image processing fails
* `audio.started` - When audio processing begins
* `audio.completed` - When audio is ready for download
* `audio.errored` - When audio processing fails
Enter your webhook details:
* **Endpoint URL**: Your public HTTPS URL (e.g., `https://abc123.ngrok.io/webhook`)
* **Events**: Select the events you want to receive:
* `video.started` - When video processing begins
* `video.completed` - When video is ready for download
* `video.errored` - When video processing fails
* `image.started` - When image processing begins
* `image.completed` - When image is ready for download
* `image.errored` - When image processing fails
* `audio.started` - When audio processing begins
* `audio.completed` - When audio is ready for download
* `audio.errored` - When audio processing fails
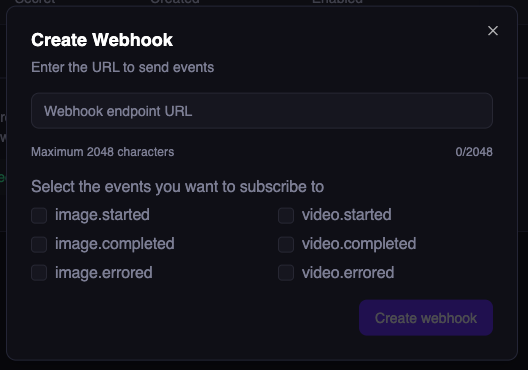 Click **Create Webhook**
**Important**: Copy and save the webhook secret - you'll need this for security verification.
Click **Create Webhook**
**Important**: Copy and save the webhook secret - you'll need this for security verification.
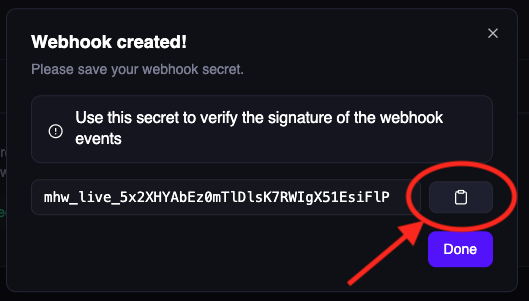 Store this secret securely! It's used to verify that webhooks are actually from Magic Hour.
## Step 4: Test Your Webhook End-to-End
Now let's verify everything works by making a real API call and watching for the webhook.
**If using your own server**: Watch the console logs
```bash theme={null}
# Your server should show:
🚀 Webhook server running on http://localhost:8000
```
**If using Colab/Jupyter**: Watch the cell output for webhook events
**If using webhook.site**: Keep the browser tab open to see incoming requests in real-time
Create a simple image to trigger webhook events:
```python Python/Colab theme={null}
from magic_hour import Client
client = Client(token="your-api-key")
# Create a simple AI image - this will trigger webhooks
result = client.v1.ai_image_generator.generate(
image_count=1,
orientation="square",
style={"prompt": "A cute cat wearing sunglasses", "tool": "ai-anime-generator"}
)
print(f"Job created! ID: {result.id}")
print("Watch your webhook endpoint for events...")
# In Colab, you'll see the webhook events appear in the cell output above
```
```bash cURL theme={null}
curl -X POST "https://api.magichour.ai/v1/ai-image-generator" \
-H "Authorization: Bearer your-api-key" \
-H "Content-Type: application/json" \
-d '{
"image_count": 1,
"orientation": "square",
"style": {
"prompt": "A cute cat wearing sunglasses",
"tool": "ai-anime-generator"
}
}'
```
```python webhook.site Testing theme={null}
# If using webhook.site, you don't need a server
# Just make the API call and watch the webhook.site browser tab
from magic_hour import Client
client = Client(token="your-api-key")
result = client.v1.ai_image_generator.generate(
image_count=1,
orientation="square",
style={"prompt": "A cute cat wearing sunglasses", "tool": "ai-anime-generator"}
)
print(f"Job created! ID: {result.id}")
print("Check your webhook.site browser tab for the webhook delivery!")
```
Within seconds, you should see webhook events in your console:
```
Received event: image.completed
🖼️ Image processing completed
Payload: {
"id": "clx7uu86w0a5qp55yxz315r6r",
"status": "complete",
"downloads": [
{
"url": "https://videos.magichour.ai/id/output.png",
"expires_at": "2024-10-19T05:16:19.027Z"
}
]
}
```
**Success!** 🎉 Your webhook is working end-to-end.
## Step 5: Download Your Result
Your webhook received the download URL. Let's grab the generated image:
```python Python theme={null}
import requests
# Extract download URL from webhook payload
download_url = "https://videos.magichour.ai/id/output.png"
# Download the image
response = requests.get(download_url)
with open("generated_image.png", "wb") as f:
f.write(response.content)
print("✅ Image downloaded as generated_image.png")
```
```bash cURL theme={null}
# Use the URL from your webhook payload
curl -o generated_image.png "https://videos.magichour.ai/id/output.png"
echo "✅ Image downloaded as generated_image.png"
```
## 🎉 Congratulations!
You've successfully:
* ✅ Created a webhook endpoint
* ✅ Registered it with Magic Hour
* ✅ Tested it with a real API call
* ✅ Received webhook notifications
* ✅ Downloaded the generated content
## Next Steps
Add signature verification to ensure webhooks are from Magic Hour
See all available webhook events and their payloads
Deploy your webhook handler to production
Explore the complete webhook API reference
## Troubleshooting
**Webhook not receiving events?**
* ✅ Check your endpoint URL is publicly accessible
* ✅ Ensure your server returns HTTP 2xx status codes
* ✅ Verify the webhook is enabled in Developer Hub
* ✅ Check server logs for errors
**Colab/Jupyter specific issues:**
* ✅ Install required packages: `!pip install fastapi uvicorn nest-asyncio pyngrok`
* ✅ Make sure the server thread started successfully
* ✅ Check if ngrok tunnel is active and accessible
* ✅ Try webhook.site as an alternative for quick testing
**AsyncIO errors in notebooks?**
* ✅ Make sure you're using the Colab/Jupyter code version with `nest_asyncio.apply()`
* ✅ Don't run `uvicorn.run()` directly in notebooks - use the threading approach shown above
**Need help?** Contact support at [support@magichour.ai](mailto:support@magichour.ai)
Store this secret securely! It's used to verify that webhooks are actually from Magic Hour.
## Step 4: Test Your Webhook End-to-End
Now let's verify everything works by making a real API call and watching for the webhook.
**If using your own server**: Watch the console logs
```bash theme={null}
# Your server should show:
🚀 Webhook server running on http://localhost:8000
```
**If using Colab/Jupyter**: Watch the cell output for webhook events
**If using webhook.site**: Keep the browser tab open to see incoming requests in real-time
Create a simple image to trigger webhook events:
```python Python/Colab theme={null}
from magic_hour import Client
client = Client(token="your-api-key")
# Create a simple AI image - this will trigger webhooks
result = client.v1.ai_image_generator.generate(
image_count=1,
orientation="square",
style={"prompt": "A cute cat wearing sunglasses", "tool": "ai-anime-generator"}
)
print(f"Job created! ID: {result.id}")
print("Watch your webhook endpoint for events...")
# In Colab, you'll see the webhook events appear in the cell output above
```
```bash cURL theme={null}
curl -X POST "https://api.magichour.ai/v1/ai-image-generator" \
-H "Authorization: Bearer your-api-key" \
-H "Content-Type: application/json" \
-d '{
"image_count": 1,
"orientation": "square",
"style": {
"prompt": "A cute cat wearing sunglasses",
"tool": "ai-anime-generator"
}
}'
```
```python webhook.site Testing theme={null}
# If using webhook.site, you don't need a server
# Just make the API call and watch the webhook.site browser tab
from magic_hour import Client
client = Client(token="your-api-key")
result = client.v1.ai_image_generator.generate(
image_count=1,
orientation="square",
style={"prompt": "A cute cat wearing sunglasses", "tool": "ai-anime-generator"}
)
print(f"Job created! ID: {result.id}")
print("Check your webhook.site browser tab for the webhook delivery!")
```
Within seconds, you should see webhook events in your console:
```
Received event: image.completed
🖼️ Image processing completed
Payload: {
"id": "clx7uu86w0a5qp55yxz315r6r",
"status": "complete",
"downloads": [
{
"url": "https://videos.magichour.ai/id/output.png",
"expires_at": "2024-10-19T05:16:19.027Z"
}
]
}
```
**Success!** 🎉 Your webhook is working end-to-end.
## Step 5: Download Your Result
Your webhook received the download URL. Let's grab the generated image:
```python Python theme={null}
import requests
# Extract download URL from webhook payload
download_url = "https://videos.magichour.ai/id/output.png"
# Download the image
response = requests.get(download_url)
with open("generated_image.png", "wb") as f:
f.write(response.content)
print("✅ Image downloaded as generated_image.png")
```
```bash cURL theme={null}
# Use the URL from your webhook payload
curl -o generated_image.png "https://videos.magichour.ai/id/output.png"
echo "✅ Image downloaded as generated_image.png"
```
## 🎉 Congratulations!
You've successfully:
* ✅ Created a webhook endpoint
* ✅ Registered it with Magic Hour
* ✅ Tested it with a real API call
* ✅ Received webhook notifications
* ✅ Downloaded the generated content
## Next Steps
Add signature verification to ensure webhooks are from Magic Hour
See all available webhook events and their payloads
Deploy your webhook handler to production
Explore the complete webhook API reference
## Troubleshooting
**Webhook not receiving events?**
* ✅ Check your endpoint URL is publicly accessible
* ✅ Ensure your server returns HTTP 2xx status codes
* ✅ Verify the webhook is enabled in Developer Hub
* ✅ Check server logs for errors
**Colab/Jupyter specific issues:**
* ✅ Install required packages: `!pip install fastapi uvicorn nest-asyncio pyngrok`
* ✅ Make sure the server thread started successfully
* ✅ Check if ngrok tunnel is active and accessible
* ✅ Try webhook.site as an alternative for quick testing
**AsyncIO errors in notebooks?**
* ✅ Make sure you're using the Colab/Jupyter code version with `nest_asyncio.apply()`
* ✅ Don't run `uvicorn.run()` directly in notebooks - use the threading approach shown above
**Need help?** Contact support at [support@magichour.ai](mailto:support@magichour.ai)